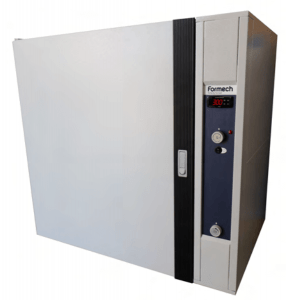
In this publication we provide more insights into how our materials and systems are used. In this case, we make a parent model for a vacuum forming machine such as, for example, Formech machines. We use the Epoxy SG Poxy 426/425 in this bulletin. An alternative pourable material can be the SG 130 or SG 2000L. An easy to process and pourable polyurethane product.
To create a model for the thermoform / vacuum forming process quickly and easily, a resin is extremely suitable for professional results. Depending on the material you can have made a perfect tool within an hour. Cost-efficient and speed are one of the most important starting points for making the models. A good alternative can be milled polyurethane blocks or milled aluminum blocks.
1 model or multiple models?
starting point: 10,000 pieces of vacuum molded parts in 3 mm HIPS in one week!
1 Model
Typical vacuum cycle time: 3 minutes:
1 x tool = 10000 cycles = 30000 minutes: 500 hours
Multiple models
Typical vacuum cycle time: 3 minutes:
10 models = 1000 x = 3000 minutes: 50 hours
* The example is an average value and does not cover everything. It gives an indication of time savings when multiple models are manufactured. In comparison with the casting of aluminum or the CNC milling of aluminum. Use a good (double) screw thread with countersunk screws to secure it to the baseboard when assembling the tools.
Which epoxy or resin do we use to make a vacuum mold tool?
To develop a model easily, quickly and cost efficiently, we recommend using a cast or brush material. We recommend for making easy models and producing small batches with the vacuum forming machine to take a SG 2000 L or SG 130. For the production of small batches or larger quantities with the thermoform machine, we recommend taking an Epoxy SG Poxy 425 or 426.
The polyurethane casting resin SG 130 and SG 2000 L are fast drying / curing cast resins that can be demoulded within an hour. The average Epoxy more often have a longer cure of 12 – 24 hours. The Epoxy are heavier so that an attachment to baseboard is easier and often also at higher temperatures.
The information below describes a simple casting process with Epoxy the SG Poxy 425 with a vacuum drawn model.
Step 1. Mold drawn from silicone or Vacuum form.
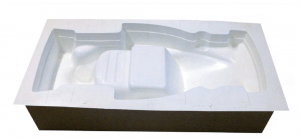 Use a mold of a plastic drawn vacuum mold or silicone mold (negative). Place the mold fixed (drawn vacuum mold mold upside down) before pouring in with the pu / epoxy resin.
Step 2. Fix the mold by mal support.
Support the template for preventing deformation. Apply enough support so that the mold is completely fixed as soon as it is poured. In silicone, a mold can be used in a brush mold or a “block” mold can be chosen so that it is fully supported (when using the correct Shore A hardness and wall thickness).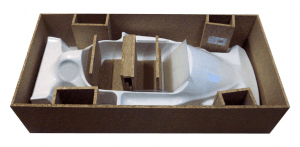
Step 3. Use release agent if necessary.
Apply a release agent to the polyurethane or plastic mold to prevent adhesion. A mold of silicone is often self-releasing, so this is not necessary. Use the correct release agent and make sure it is sufficiently opaque. in the case of silicone spray (Pol-Ease 2300) the mold can be brushed with a dry and soft brush. When using a wax release agent (R5), the wax has to be polished / polished to ensure a good coverage and the model has a glossy surface with a matt surface through the wax.
Step 4. Use filling material.
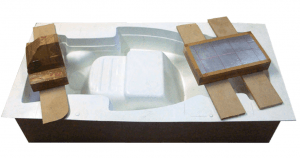 To obtain a cost-efficient mold, filling material can be used for the filling of large volumes. When foam blocks are used (large and economical) they must be coated, sealed (sealed) with a sealant or, for example, with simple tape. The blocks do adhere to a resin of epoxy or polyurethane, so it has to be treated with a release agent. The blocks must be able to be put in place otherwise they will float.
Stap 5. het ingieten van de mal.
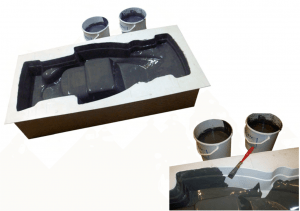 Giet eerst altijd het onderste deel van de mal in met een kleine hoeveelheid van de hars. Vanuit dit punt kan de hars worden uit gekwast over de gehele mal zodat er een volledig gedekte coating is. in geval van de epoxy met voldoende uithardingstijd, laat je de laag eerst drogen totdat de eventuele luchtbellen aan de oppervlakte komen. Deze kan je vervolgens met de kwast voorzichtig open stempelen. Wanneer de luchtbellen volledig verdwenen zijn kan je de volledige gieting afgieten. In het geval van een snel hardende hars, moeten deze direct worden ingegoten. Houdt wel rekening met de volume van de opvul blokken!
6. Place the position fill blocks.
 Before casting the casting to the edge, place the fill blocks. Provide extra weight on the blocks before you completely drain the casting and the desired height is reached. The foam blocks can float so ensure sufficient weight on the blocks. Allow the polyurethane or epoxy resin to harden completely until it is releasable. Always consult the Technical Data sheets of the material for this. Average values for polyurethane resins are 30-120 minutes and for Epoxu 12-24 hours.
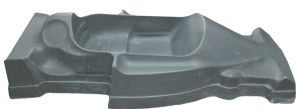
Step 7. Demolding from the mold.
After the complete curing time or release time has elapsed, the newly formed model can be removed from the mold. First remove the foam blocks from the mold and resin and then the cast model can be demoulded.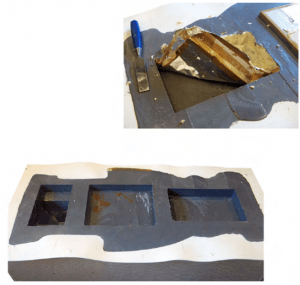
Step 8. post curing with some epoxies.
Read the TDS info sheets for post curing. In some cases of epoxies but also some polyurethane materials, a post curing is prescribed. This can be at various heat settings but also the time varies. At the SG Poxy 425 we recommend the following post curing for:
Hardening (RTV) first 24 hours at room temperature. Then heat at 40°C for 1 hour,
If you want to optimize the model for airflows during the vacuum forming process, we recommend drilling the desired holes for the second post cure phase in the model.
Step 9. post-treatment (blasting and drilling).
Drill the required holes, for example 1 mm – 1.5 mm, for the optimum airflow for the vacuum forming process. We recommend doing this after the first post cure and for the second one because the hardness is optimal for drilling. The model can be blasted and polished for an optimal clean surface between post curing or after curing.
Step 10. Continue post curing
Continue the post curing with heating the model, 1 hour at 60°C followed by 1 hour at 80°C, then 1 hour at 100°C and finally 1 hour at 120°C.
If necessary, treat the surface once more.
